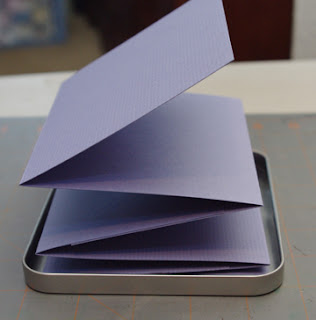
Family History Photo CD Tin

I've spent the last 4 hours working on a family history photo tin.  It's a project I'm preparing for my family reunion/campout this coming weekend - and I've got to make 35 kits.  I've actually prepared this type of project for another family reunion I did a few years ago and it went over so well, I offered to do it for the Schaub family this year.

In case you're interested, this is a small 4 generation accordion photo album.  My dad helped me with the family group sheet and collecting all the photos.  Fortunately I was born into a family that likes to take photographs and we've been doing it for generations.  Probably one of the most enjoyable parts of this project was going through old (as in 1800s) family photos - it's interesting to see how prevalent some genetic traits are.

Here is a little tutorial if you'd like to make you're own CD Photo Album.  I've also created an instruction sheet with supplies and dimensions. You can download it here - CD Photo Accordion Album Instructions.

Here are the general supplies:

The instruction sheet will give you the dimensions of everything.  First, cut three strips of cardstock each at least 5 inches wide.  I'd recommend using 12x12 cardstock so you can get at least 2 strips out of it; however, if you want to you can use 8 1/2"x11", but you'll only get 1 strip out of each sheet.  Fold the strips at 4.25" (again check out the instruction sheet for details).

Here the strips are folded, and you can see where you'll need to glue them together.  You'll need to attach (glue sticks work great) square "A" to square "A" and square "B" to square "B" making sure that each square is 4.25" tall.
Then you just add your photos and decorate with paper.  I try to stay away from any embellishments that will add bulk (i.e. - pop dots, brads, flowers, etc) because the album is going to have to fit into a CD tin and with too many puffy embellishments the tin will look like an over stuffed suitcase.  Make sure that you do NOT decorate the top and bottom squares.  The bottom square will be adhered to the inside of the tin and the top square will have your "cover page".  Also make sure you check regularly to ensure that your photos are all going in in the right direction.

To adhere the album to the tin you will have to use glue dots -- these are the only things "powerful" enough to hold the paper to the metal.

Pretty simple and straight forward.  Here are a few photos of the finished album.


You should make a tin of your own.  They're a very simple way to share family history and they make great gifts.

Hot, hot, and hot brought to by the letter S

I'm really having fun with the 365 A Photo A Day. I'm looking for opportunities to record life. My skills still need improving, but it's coming along. Rather than bore you with a daily photo log, I think I'll just share with you the highlights of my life.

Saturday, June 25 - Crop Day
You probably realize by now that I like to scrapbook. It is a creative outlet for me that does not require a computer (which I desperately crave). I started a scrapbook group about 7 years ago called the East Valley Scrapbook Guild and have met some wonderful women through it. We get together about once a month to crop. The Saturday before last my sister was able to join us. The time always flies too quickly when I'm cropping with friends. I did take time out to snap a few photos.


The other big news from this past week has been the temperature. For my friends who live in AZ, you experienced it first hand...it was stinkin' HOT this week. On Wednesday, June 29th it was really weird because it also rained. So it was 110 degrees outside and raining. Don't believe me, check it out...


Friday's letter of the day was brought to us by my 2 year old niece....


The letter S.


This past Saturday, July 2nd my youngest brother and his wife moved from far, far, far east Mesa (ASU housing) to Kingman.  Did I mention it was a record breakingly hot...again, my obsession with the thermometer...
Yes, that thermometer is reading 119 degrees, and I should probably tell you that the thermometer itself is outside under the shaded patio.  So that was 119 degrees under the shade. AAGGHH!!!!!

So, my dad, brothers, and brother-in-law loaded everything up very early in the morning - can you imagine how much fun it is to load up a moving van with 4 engineers and a physical therapist (doesn't that sound like the start of a joke).  And then they all rolled out for a 4 hour drive to Kingman. 


My sister and I rolled in behind them and spent 2 1/2 hours cleaning their old house for them...yes, that's love!  I wouldn't say that we had fun, but we definitely worked up a sweat.  Now I normally try to avoid sharing picture of myself but I'm actually going to post one. AND, it's a horrible picture of me because I have no make-up on, i'm wearing my workout clothes, and i've just spent 2 1/2 hours sweating and cursing over an old kitchen floor. Tada...

And the only reason I had my picture taken was because it was the condition under which my sister would allow me to take her picture.

OK, for a recap of my Sunday, July 3rd photos you'll need to head over to my food Blog - A Feast For the Senses, because Sunday's pictures were of my 3-ingredient-roast-that-will-knock-your-socks-off.

AND, last but not least, HAPPY 4th of JULY!!!!  I'll be celebrating today with family.  I'm grateful to be an AMERICAN and deeply grateful for the men and women who helped establish this country and continue to sacrifice so that I may enjoy the blessings of liberty and freedom.